Monday, August 11, 2014

Crockpot Chicken and Sausage Creole

Hello! I'll just go ahead and put this out there for those who haven't heard yet. Joe and I found out today that our baby on the way is a BOY!!! :) We're pretty excited and happy to stop calling him "it" haha. Once I finish a few current projects I'll be able to start on the baby's room. Hopefully I'll remember to keep you guys updated on that.

For tonight I just have a recipe to share. But it's a good one! I found this recipe earlier this summer and have probably made it 3-4 times since. As the weather gets colder in a couple of months, I imagine that we'll be having it for dinner even more often. The other nice thing about it is that it makes enough for 3 meals for us. I just freeze two containers and it reheats great. This recipe is from a blog I've referenced before called Pinch of Yum and as with every other recipe from that site, this one is fairly simple and always turns out great! If you want to see her exact recipe as well as some beautiful food photography then definitely click on the link and check out her post.  


I made very minor tweaks to this recipe based on things we had available at home. Also, if you're not lucky enough to live down south where you can get some real andouille sausage, then I recommend the Johnsonville version that you should be able to find at your regular grocery store. They make a couple of versions and they're both very tasty! Here is how I make it:

Crockpot Chicken and Sausage Creole

2 green peppers, diced
1 large white or yellow onion, diced
2-3 cloves of garlic, minced
1 lb Andouille or smoked sausage, sliced
1 lb boneless skinless chicken breast, whole, frozen
8 oz. can tomato sauce
15 oz can diced tomatoes (I use fire roasted tomatoes from Aldi and they give a really nice flavor)
3 T tomato paste
2 cups chicken stock
1 can black beans, drained and rinsed
Cajun Seasoning to taste (probably start with a couple teaspoons)
Rice for serving (I was thinking today that this would also be AMAZING served over cheese grits. Just sayin')

I usually start this dish the night before we're planning on having it for dinner so that there is less prep work in the morning. All I do the night before is chop the onions, peppers, garlic and sausage and put it all in a large container so it will be ready to dump in the crockpot in the morning.

All the "pre-chop" ingredients

When you're ready to get the crockpot going, add the pre-chopped veggies and sausage, tomato sauce, diced tomatoes (including juice), tomato paste, chicken stock, cajun seasoning and black beans and stir to combine. Then add the frozen chicken breasts and kind of nestle them down in the liquid.

Everything else (minus the chicken broth and Cajun seasoning)

Pre-cooking

Put the lid on the crockpot and set on low for 8-10 hours. After the 8-10 hours of cooking, use a couple of forks to shred the chicken breasts right in the crockpot. Then you can either turn the crockpot off or set it on warm while you make some rice. Serve over rice and enjoy!

Post-cooking, but before shredding the chicken

All done!

Like I said, we really love this dish and I plan on making a few batches to add to my freezer "stash" before our little man arrives. If you wanted to stretch it a little farther you could add more liquid, another can of black beans, or more veggies. It's a pretty versatile recipe.

In other news, I got a wild hair this weekend and decided that the shower in our master bath needed to have the tile grout resealed and all the caulk removed and redone. (Is this what people mean when they talk about "nesting"? haha) So I sat and scrubbed on Sunday and started trying to cut out the old caulk tonight. After about 2 minutes of trying to remove the caulk, I started to second guess myself. Maybe this wasn't the best idea, but I'm too far in now and it has to be finished! I just hope that in the end I have a shower that looks nicer and stays clean a little longer. There will be no before and after on this project because well, it's just a shower. But if I'm away from the blog for a bit, you can at least guess why. I think that's it for tonight, thanks for reading!

Thursday, August 7, 2014

Homemade Chicken Stock - a.k.a Liquid Gold

Disclaimer: The pictures in this posts aren't exactly pretty, but they do show the steps to make some delicious chicken stock :)

I used to buy boxed chicken broth whenever I needed some for a recipe but it didn't have a whole lot of flavor and I always wondered how many questionable ingredients were in it. I knew that chicken broth could be made at home but I figured it would be some kind of laborious undertaking requiring me to stand over the stove for hours stirring a pot. That changed when I stumbled across a blog post one day that talked about making chicken stock in a crockpot. It looked super simple but it required having some pre-cooked chicken bones to use as the base of the stock. Since we always buy boneless/skinless chicken breasts, I had no bones available. However, after roasting a couple of whole chickens and saving all the bones from each one, I finally had enough to make a batch of chicken stock.

I first made this last summer and have made it a couple times since. In the last year we haven't had to buy boxed chicken broth at all! Quick side note: I just looked up the difference between stock and broth and apparently stock is typically made with bones and cooked a long time to get some of the gelatin out of the bone, giving it a thicker consistency. Broth is made with chicken meat and not cooked as long. Anyway, back to the recipe. Once you've got the chicken bones saved up, it really couldn't be easier to make a whole bunch of broth. It's kind of a "set it and forget it" recipe.

Homemade Chicken Stock
makes about 4 quarts

Tools needed:
- Large crockpot )I think mine is 6 quarts)
- Slotted spoon
- Mesh strainer
- Cheese cloth
- Containers for freezing chicken stock.

Ingredients:
- Bones from about 2 whole fryer chickens (probably about a pound of bones). The ones I use typically still have bits of cooked meat and skin on them, but that's fine. Just gives it more flavor!
- 1 carrot
- Small onion, or 1/2 an onion
- 2 cloves of garlic
- 1 tsp. whole peppercorns
- 1 bay leaf
- small sprig of rosemary (optional, we just happened to have some)
- water

You'll notice I don't add any salt. I figured there was some on the chicken from when I seasoned and cooked it originally. Plus not adding salt will keep the sodium of the finished stock lower so that you can just add salt to the dish you're using it in instead.

To start, dump your chicken bones into the crockpot. I freeze the bones until I'm ready to make stock and then just use them right out of the freezer without thawing them. Next, pour approximately 5 quarts of water into the crockpot. You probably want to keep the water level to within an inch or 1/2 inch from the top. I like to use hot water so that the frozen bones will break apart from the big clump they're in.


Then give your vegetables a rough chop. No need to peel the carrot or anything. For the garlic just smash it with the side of the knife.

Add caption

Add the vegetables, peppercorns, rosemary, and bay leaf into the crockpot. Give everything a little stir then put the lid on, plug the crockpot in and set it on low.


Let the stock cook on low for a full 24 hours. Just a word of warning, this WILL make your entire house smell like roasted chicken. So if that doesn't sound like something you want, maybe consider setting the crockpot in the garage or something. Although if you're making this on a cold winter day, it might be kind of comforting to have something so tasty smelling cooking all day :) After cooking for 24 hours, turn the crockpot off and either let it sit for a little bit to cool, or you can go ahead and start straining it out.


To get the stock ready for storing, start by using a slotted spoon or "spider" to scoop out all the bones and large chunks of vegetables.


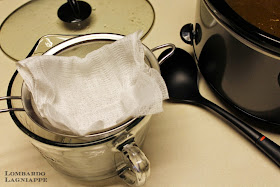
Then set a mesh strainer over a large bowl, or in my case an 8 cup glass measuring cup, and line the strainer with some cheese cloth that has been doubled up a couple times.


Using a ladle, begin scooping the stock from the crockpot and into the strainer. If you see any chunks or things getting through the strainer, you may want to add another layer of cheese cloth. In the end you should have a strainer full of nasty bits, and two big bowls of liquid gold :)


I like to divide the stock up in a few different ways. With this batch I ended up with 3 pint containers, 1 quart container and 24 "pucks". To make the little pucks of broth I use flexible silicon cupcake holders that we found at Walmart. They work amazingly well for this! Once the stock is frozen you just peel each flexible mold off and place the puck into a Ziploc bag. I like having these if I just want to add some stock to a sauce but don't need very much.


This homemade stock is also really nice to drink when you have a cold. I've taken out a couple of the pucks before and heated them in the microwave just to drink. It may sound a little strange but it tastes great and some people swear by the healing properties of this "bone broth". It's worth a shot, right?!

Well, like I said, not the most appetizing pictures today but maybe it got you thinking about making something at home that you'd usually buy at the store. Also, if you're thinking you'd like to roast a couple chickens at home in order to get the bones for the stock, there are tons of good tips and recipes online. Just do a quick Google search. In the next couple days I'll share a recipe that I've been making a lot recently and that will use some of this stock. Thanks for reading and have a great night!

Monday, August 4, 2014

Trash to Treasure - Retro Chair

Tonight we finally got around to taking some pictures of the chair that I mentioned in the last couple posts. It's all finished, and Joe and I are quite happy with it. This really was a tag team effort between the two of us. Joe offered to take on the refinishing of the wood while I handled the re-upholstery of the seat and back. I'm not sure which of us had the more difficult job but I do know that we got the ones best suited to us :)


The story of this chair starts with me first spotting it at the end of someone's driveway on trash day. I actually drove by it in the morning while it was drizzling, and thought about stopping right then to pick it up. However I was already running late for work and thought that the rain might be ruining the wood. So I didn't pick it up then but instantly regretted it haha. I thought there would be no way that the chair would still be there when I was coming home, but lo and behold it was! This time I stopped and gave it a quick look over. Besides needing some love it seemed to be in good condition, and it passed my "shake test". Basically I tried to shake and wiggle the chair to check for structural stability. It was solid! So into the back of my car it went. This is the first piece of trash furniture that my new Subaru has had the honor of hauling :) When I got it home and showed Joe, he was of course less than thrilled that I had brought yet another piece of furniture into the house that needed work, but he did admit that it was a cool chair and that it seemed solid.


A quick background about this chair. It had a couple tags on the bottom that told me it was made by the Sikes Furniture Company in Buffalo, NY. There was not a date of manufacturing, but the model of the chair was 1954. I have no idea if that correlates to the year it was made, but maybe so. Another tag on the bottom let us know that the wood was walnut. I did a little research but couldn't find too much information about the Sikes Furniture Co. or the value of the chair. So we decided that we would keep the chair for ourselves once it was fixed up. I would call the style of this chair either "Danish Modern" or "Mid-Century Modern". As implied by the name, this style of furniture was made around the middle of the 20th century and was often modeled after Danish designs that used clean, modern lines, slim legs, solid wood, and minimal excess decoration. I'd say the defining characteristics that make this chair fall into that category are the interesting angles on the arm rests, the solid walnut frame and the brass tips on the narrow front legs. If curious about other examples of this style, just Google either of the terms above.

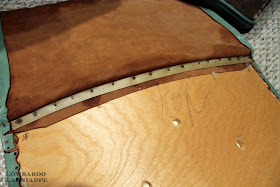
On to the makeover! It started with me removing the seat and back cushions which were conveniently attached with screws from the back and underside. Then I began the very tedious removal of hundreds of upholstery tacks. I had to pop each one up with a flat-head screwdriver then pull it out with some needle-nose pliers. You can kind of see in this picture how there were layers of fabric and piping that were tacked on on top of each other. Removing each layer revealed another row of tacks.


After removing all the old vinyl (or leather, I'm honestly not sure) covering I needed to check and see if the padding underneath was usable. I really wanted it to be so that I didn't have to bother replacing it. I veeerrrrry cautiously gave one of the cushions a little sniff and didn't smell anything. So I sniffed a little closer and a little more haha. Miraculously the padding didn't have any bad smells and I was able to keep it. It must have been sealed in really well under the vinyl all those years.

A couple weeks after that I finally got to work on recovering the cushions. I cut pieces big enough to wrap around the cushions with plenty of excess to pull on. I started out trying to just use a hand held staple gun but the wood base of the cushions was so hard that the staples wouldn't go in all the way. After trying to hammer a few of them in the rest of the way and failing miserably, I decided to consider getting a pneumatic upholstery stapler to use with our air compressor. We found one on Amazon for $25 and it was the best money we've spent on a tool in a long time! At least as far as I'm concerned. It made the rest of the upholstery job so easy. I still used the hand held staple gun to kind of tack the fabric in place since it was very simple remove those if I needed to re-position the fabric. While re-covering the cushions I tried to keep a couple things in mind. First, keeping the fabric centered on the chair and second, pulling the fabric very tight so that there wouldn't be any wrinkles on the finished top. I think I was pretty successful!

First I covered each cushion with the main top piece of fabric.


Then I sewed a bunch of piping to use around the entire seat cushion and the top of the back cushion. Once that was made, I was able to attach it using the air stapler as well.

When stapling the piping around corners I snipped some notches into the fabric to reduce the bulk at the corner. 

Only the top edge of the chair back needed piping. 

The back of the chair back also had to be covered with the main fabric since it shows through the back of the chair frame. I had to attach the top edge of that first from underneath so that the staples would be hidden. I did it very similar to the how the old backing was attached which you can see in one of the old pictures above. For the bottom of the seat I used a coordinating piece of fabric from my stash to cover everything and give it a nice finished look.

While I was working on all the upholstery, Joe took care of the chair frame. When he started there were lots of areas that had surface staining, scratches and gouges.


He started the re-finishing process by hand sanding the entire frame with 80 grit sandpaper. Then he moved on to 120, 180 and finally 220 grit. The difference when he was done sanding was amazing!


The wood looked awesome and I could start to see the beauty of the finished product. After sanding he did a little research on how to finish the wood. Options include, polyurethane, lacquer, wax, oil, and who knows what else. We decided to use Danish Oil which is a common finish for mid-century modern furniture. The dry wood really soaked up the oil and Joe ended up applying a few coats over about a week or so.


I loved seeing the beautiful grain of the walnut shine through!


The final step in the makeover was to polish up the brass tips on the front legs. To do that I just used some Brasso and old t-shirts scraps. They polished up pretty nice. Now for some finished pictures of the chair.

A little detail of the cool fabric I found. 

Here you can kind of see how I covered the bottom of the seat to hide all the edges of the stapled fabric. 

As you can see I didn't quite get the fabric super smooth along the edge of the seat but I'm still happy with it. 

Here you can see the cool flared arm detail.


Sorry for the picture overload but I'm just happy to share it I guess. I hope you all had a fun weekend and are enjoying the last few weeks of summer. I've got one more furniture makeover in progress that will hopefully be done soon if my sewing machine will cooperate. In the mean time I'm hoping to share a couple recipes this week. Until next time, have a great night!