Wednesday, September 11, 2013

The deck is done! The deck is done!

...well, except for staining/sealing. But I'm calling it done! Tonight we glued on the rest of the post caps and added a few more nails to existing joist hangers, then just like that, all the "building" was done. As I'm sure you know, because it's all I've been talking about for the last 3 or so months, we've been working on this project for a while. If you saw our old deck in person, you know why it needed to be replaced. It was a bit of a hazard for anyone who didn't know its little "quirks". Like which boards not to step on and which hand rails not to lean on. But it's all safe now! Feel free to come over and dance across the deck and lean on any hand rail you want!

This is going to be a pretty picture heavy post so I'll try and just comment on pictures as I go. We'll start with some pictures of the old deck. Then a couple of progress pictures, followed by the final deck. Here we go!

The lovely old deck:


One thing we didn't like about the old deck was the various board sizes and the exposed screws and nails. Each board was nailed AND screwed down at each joist. Also, it wasn't good that two boards would meet up over one joist. That left very little room to fasten each board and made the boards more likely to rot. You'll see in pictures of the new deck how we fixed those problems :)


You can see in the picture above that the old deck had benches. There was one like that on either end. While they were occasionally useful, they weren't in the best places and it's not like we could move them. We decided that the benches would not be returning with the new deck.


That railing is definitely not safe!

This one isn't as obviously unsafe, but give it a little shove and it would almost fall off the deck on its own.


The landing where you can access the garage was supported by posts on one side, and by a little friction on the other. See the post that is kind of wedged against the house? It's like that because the nails that had attached the ledger to the concrete rusted through (again...nails, not bolts), and the landing sagged until the post was pinned against the house.You'll also see it caused the stairs to drop some and expose unpainted parts of the house. Joe jacked up that side of the landing and attached it to the foundation of the house with some heavy duty anchor bolts into the concrete. It's not going anywhere now!


If you talked to us at the beginning of this project, we probably told you that we were definitely going to use composite decking. We ordered several samples and went to a few places in Kansas City to get more information on them. Unfortunately, our favorite samples were also the most expensive and it led to us to reconsider using wood instead of composite. Below are all of our composite samples. I'll spare you from our decision process, but in the end we decided to go with cedar for the decking and railing. We will have to stain/seal it every few years but we decided we could handle that. I guess time will tell :)


We took apart the old decking piece by piece which meant removing about a million nails and screws, give or take a few (Joe says it ended up being about 16-18 lbs of nails and screws). We had to be careful to not harm the structure of the deck since we planned on keeping all of it and it was still structurally sound. The first thing to come off was the fascia, followed by the walkway, the stairs and landing, then finally the main decking.


Here is just one bucket full of nails and screws. That blue and yellow tool next to the hammer is something called a "cat-claw" that we borrowed from our neighbor and it was a LIFE SAVER when it came to pulling nails. 


Once we a good chunk of the decking removed and reinforced certain parts of the framing, we placed our big lumber order and it got delivered to the house! The delivery truck dropped the lumber off on our driveway so Joe and I had to carry it all into the garage. We couldn't park in the garage for a few weeks :) 


Then we started building! We started by installing the 4x4 railing posts then built the stairs and worked our way down the walkway to the main deck. Joe had to measure and cut new stair stringers (the zig-zagged wood the steps are attached to) because the old ones were rotten at the bottom and had about a dozen nails where the posts were attached. This took a lot of measuring, calculating, and cuts, but it all came out great!


You can see in the picture of the walkway above that we were able to use 20' boards on that section and avoid having to decking meet up over joints like I mentioned at the start of the post. We also used 20' decking on the main portion of the deck, but since the deck is actually close to 40' across, we placed two boards perpendicular to the house down the middle of the deck to kind of create 2 sections. In order to do this we had to add blocking between the 2 center joists. You can see those extra boards below. 


After all the decking was down and the last few posts were put in place, we had to attach the railings. We decided on aluminum balusters (aka spindles) because they'll be more durable and lower maintenance. The railing and boards that the balusters are attached to are 2x4 cedar. Joe cut all the sections to length and then we attached them to the posts (more on that later). We had to calculate the distance between posts to figure out exactly how many balusters to put in there and how much spacing there should be between them. We're really happy with how they turned out!


The FINAL step in the deck was gluing on the post caps. We opted for copper caps so that there wouldn't be any wood grain exposed since that would be a prime place for rot. To glue them down we used gorilla glue and bags of sand for weight.


Now for completed deck pictures!


Step out of our back yard and take a walk up the steps :)


Take a right at the landing and stroll down the walkway.


Admire the seamless decking :)


Hang another right and you're on the main deck. Hear the angels singing!


Then maybe walk to the other end and take a look back at where you came from.


And that's the deck! Real quick I want to tell you about how we attached all the various parts. When you're walking around the deck, you won't see any screws holding the decking down. That's because we used a tool called a Camo Jig that allows you to drill special screws into the edges of the decking so they'll essentially be hidden. Below you can just barely see the screw hole on the edge of the board.


For the hand railing we used another special tool called a Kreg Jig which pre-drilled pocket holes so that boards can be connected more securely. All the angled holes you see in the picture below were done using the Kreg Jig. You can also see in the picture below that the black aluminum balusters were just screwed into the railings from the outside.


We couldn't have completed this so quickly ("quickly" is relative of course haha) with out a few other tools. Joe's impact driver made driving all the screws a cinch. We also borrowed an air powered hand held hammer from one of my coworkers that saved Joe some serious forearm fatigue when adding blocking between joists. The other helpful thing we can't go without mentioning is the help of our friends. Our friend Greg helped demo the deck and haul old decking to the curb and another friend Josh helped with the demo and the re-building. We have the best friends :) Although they may not stick around long if we keep making them work on projects. Greg also helped install the hardwood floors in our dining room haha. Well, I guess I should wrap up the longest post in the short history of Lombardo Lagniappe. First, one more picture of the deck just because. Thanks for reading and have a great night!


Wednesday, August 28, 2013

Crockpot Chicken Cheesesteaks

I guess it's time to hop back on the blogging wagon again. Remember that time I said I'd try and blog twice a week this year? Yeah, I've obviously forgotten it too. In other news, summer weather has finally reached KC even though according to the calender, summer is almost over. This year is just flying by! We've had some friends and family pass through recently and it's been nice to visit with people that we don't get to see very often. In our free time though, we've been staying pretty busy.

If you've talked to Joe or me recently you know what we've been up to lately. Say it with me, we've been..."working on the deck".  But we're almost done! I predict that after this 3 day weekend, the deck will be complete! Everyday after work for the last couple weeks, we've been coming straight home from work, eating a quick dinner then working on the deck until it's dark out. In an effort to maximize the amount of work time before it gets dark, I've been planning super quick or crockpot meals for or dinners. This recipe is one of those dinners. We've had these sandwiches several times this summer and we love them! I actually got the recipe from the same website that the Philly Cheese Chicken Sandwiches came from. The blog the recipe is from is called How Sweet It is and I promise she has recipes for more than just chicken sandwiches haha. This crockpot pulled chicken is soooo easy and delicious! Here's the recipe:


Crockpot Chicken Cheesesteaks
From: How Sweet It Is

2 green peppers, sliced
2 yellow onions, slices (I used one really huge onion)
4 garlic cloves, minced
1 1/2 pounds boneless, skinless chicken breasts
Smoked paprika (Don't substitute regular paprika, the smoked verison is part of what makes this so delicious!)
Salt and pepper
8 ounces of beer
8 ounces of sharp white cheddar
Buns


Start by placing the peppers, onions and garlic in the bottom of the crockpot.


Season both sides of the chicken with the smoked paprika, salt and pepper.


Place the chicken on top of the peppers and onions in the crockpot.


Then pour the beer into the crockpot. Cover and cook on low for 8-10 hours.


When the time is up, use a couple of forks to shred the chicken.


There will be a lot of excess liquid in the crockpot. I typically try and scoop some of that out before adding the cheese.


Next, take you sharp cheddar and shred the whole block. Then add almost all of it to the crockpot. You can save a little bit to top the sandwiches with.


Stir the cheese in to the chicken and let it sit for a few minutes before serving.


Pile it high on a bun and eat up before the bun gets too soggy! It would probably help to toast the buns first, but I haven't tried that.


I guess that's it for tonight! Keep an eye out for a post about the deck next week. I want it to be done so badly. In the mean time though, I may share a couple more recipes or cakes. We'll see. Have a great night!

Monday, August 5, 2013

Baby Albert's Baptism and Cake

Good evening! Did you all have a good weekend? We did, and we made some good deck progress. I also got one step closer to finishing the cabinet doors on the built-ins. This week, we're back to work on the deck again, but we're getting closer every day. I mentioned in the last post that two weekends ago we were in St. Louis for the baptism of our little nephew, Albert. Joe's sister, Abby, asked if I'd make a cake for the reception after the baptism and told me I could have free reign on the design :) I did some quick Google searching and found some ideas I liked then just kind of pieced it together from there. The cake is chocolate with a combination of vanilla buttercream and chocolate ganache on the inside. I could eat that combination everyday :)


On the bottom tier I did a sort of "quilting" design. I used a ruler with 2 toothpicks taped 1" apart to mark the top edge of the cake. Then I folded a piece of cardstock at a 45 degree angle and used that as my guide to make all the lines on the cake. It ended up working pretty well! Then I cut all the decorations for the top and bottom tiers out of modeling chocolate and used the wax paper transfer method to stick them on the cake. After transporting it to St. Louis, the icing under the fondant got a little soft, so it all ended up looking a little lumpy, but not too bad. It still tasted good!


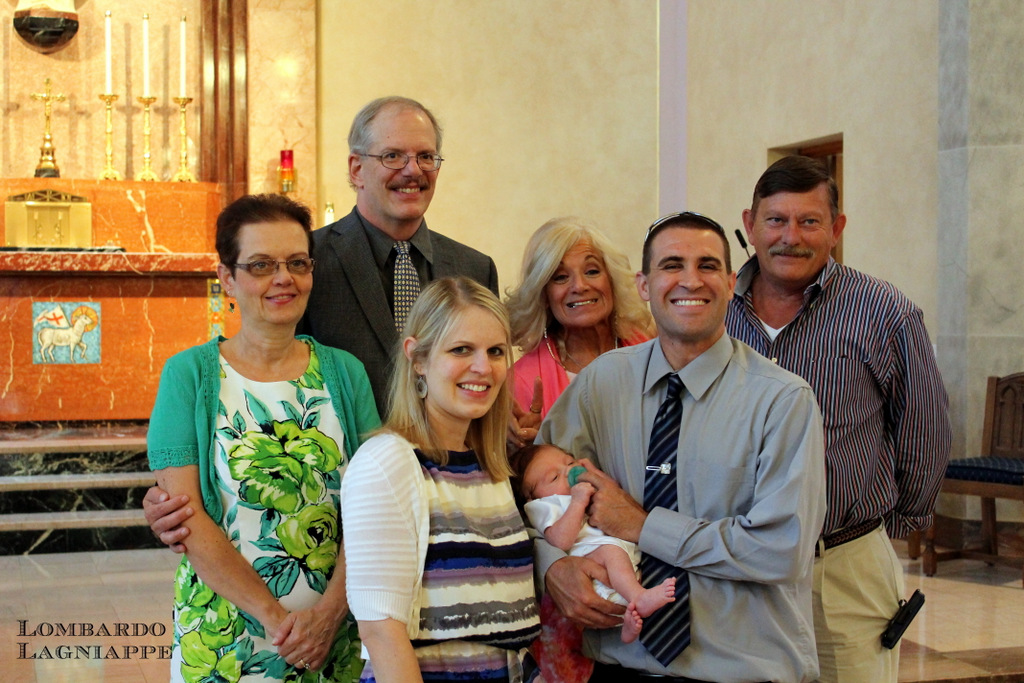
Now for some pictures from the actual baptism. I hope Abby and Albert don't mind that they're in pretty much every picture haha. They just happen to be responsible for the star of the show!

Baby Al behaved very well!

Albert, Abby and Baby Albert

All of the Great-Grandparents

The Grandparents

The Godparents

Uncle Joe and Aunt Lisa :)

Uncle John, Aunt Theresa, Liz, Lance, Grandma and Papa

We had a great time visiting with everyone and it was nice that all of Joe's Grandparents and his aunt and uncle were also able to come in town to celebrate. It was crazy to see how much baby Al had grown since we last saw him and I know he'll just keep surprising us every time we visit! Well, we don't have to many exciting things coming up, but I have finally been documenting some recipes that I want to blog about, so hopefully I won't go to long without posting. Until then, have a great week!

Monday, July 29, 2013

Sara and Andy's Wedding!

*Warning, this is a SUPER long and picture heavy post!* :)

Hello! I hope you all had a great weekend! Joe and I headed to St. Louis this morning to celebrate with Joe's family for our new nephew, Albert's, baptism. I'll share pictures from this weekend in the next post hopefully. Tonight I finally want to show you some pictures from our trip to Seattle for my sister, Sara, and her new husband, Andy's, wedding. This was my second time in Seattle, and Joe's first time and we could not have asked for more perfect weather for the trip and the wedding! We arrived in Seattle on a Thursday afternoon and left on the Monday after the wedding. The trip wasn't all fun and games though, I had a job to do! My task was to make the wedding cake. Sara had arranged with her friend, Juliet, to let me bake and decorate the cake at her house and she had an amazing kitchen. I wish I could bake all my cakes there! Thanks again to Juliet for letting me invade your house and mess up your kitchen!

When we arrived on Thursday, we headed to Sara and Andy's house for a BBQ with all the family who were already in town. Sara and I also went grocery shopping for cake ingredients that afternoon. I don't have any pictures from that night, but we had a great time visiting with everyone and getting psyched up for the rest of the weekend! Then on Friday, all of the guys (including Joe) headed out at 4:30am for a fishing trip in Oregon. The went sturgeon fishing and they each caught two. Though they didn't get to keep any of the fish, they did get a few pictures to prove they caught some HUGE sturgeon! Joe got one that was over 7 feet long, and my dad hooked one that was about 9 feet! I don't have any of those pictures to show, but I have seen them, so I know it's not just a fish tale :)

While the boys were fishing on Friday, the girls started the day with brunch at a place that specialized in local products. The french toast, waffles and pancakes were amazing, and there was a toppings bar with all the best local fresh fruit and berries. It was delicious! After we stuffed ourselves, the bridal party headed to Banya 5 spa where we had fun going through a series of Russian bathes. We started by sitting in a hot tub for a bit, then we sat in a super hot sauna before jumping into a pool that was only 47 degrees! It was breathtaking to say the least :) But for some reason, it was hard to do it just once! I know it sounds crazy, but I did the hot to cold jump twice and it was actually really refreshing haha. After sitting in the hot tub a bit longer, we left the spa and went to get our nails done. The rest of Friday and the first half of Saturday was spent baking and decorating cakes at Juliet's. And then, I finally started taking pictures haha. We'll start with the rehearsal dinner on Saturday night.

The rehearsal and dinner were at the Alki Bathhouse at Alki Beach. The food was soooooo good and we ate every last bit! The views of the Seattle and the sunset were beautiful too.

Mom and Dad at Alki Beach


Hey Gracie!


Sara's Matron of Honor, Stephanie with her husband, Scott, and daughter, Savannah. 


L-R: Cindy Buckner, Mimi, Aunt Margaret, Ellis Buckner
 
Uncle Harold and Mary


Grandma, Sara (the bride), and Grandpa

On Sunday, the boys worked on decorating and setting up the ceremony and reception venue and Mom and I delivered and set up the cake. Then we picked up Mary and Grace and headed to Sara's hotel room where she was getting ready for the wedding. We helped her get into her dress and out the door, before making a mad dash to get ourselves ready! Dad picked us up and it was time for pictures. After a photo session at the Seattle Sculpture Park, we headed to the ceremony and it was showtime!

The beautiful bride!

Sisters getting beautified too!

Gracie made sure Sara got all hooked in. 
And Mary tied her up :)


Sisters! 

The wedding went smoothly and we ate and danced the night away at the reception. I don't have a ton of pictures, but that's because I was to busy dancing :)


The Bride and Groom with our Great Uncle Harold. Thank you Michael for taking this picture!


The cake! It wasn't as yellow as it looks here. 


Yellow butter cake with Nutella filling and cream cheese frosting. 

All the Trowbridge cousins who were there. Back Row L-R: Thomas, Patrick, Kate Alice, Lisa, Sara, Mary.
Front Row L-R: Andrew, Matthew, Grace

I had to include this one. Joe is responsible for taking it. I just think it's funny. 

On Monday we went up in the Space Needle for one last view of Seattle before heading home. Oh, and we also made Grace run around this maze while we timed her. She made pretty good time!

Lookin' good, Grace!

You did it!

Downtown Seattle as seen from the top of the Space Needle.

So pretty. 

I didn't have any group pictures that didn't have the spot on Joe's face! Sorry, Joe :( 

It was so great to see everyone, and although it was a bit of a whirlwind weekend, we had a blast. We're looking forward to doing it all over again in December for my other sister, Mary's, wedding in Louisiana :)  Congratulations again to Sara and Andy! Good night!