Tuesday, February 26, 2013

Hot Wheels Birthday Cake


Today Joe and I dug our driveway out from under about 10 inches or more of snow for the SECOND time in less than a WEEK. Not cool Kansas. Not cool.

Animal tracks in the snow. 
The nice thing about this excessive snow is that Joe and I both stayed home from work. We did both have our work laptops at home so we were able to get some actual work done, but really it was just nice to be at home during the day together. I did spend part of my time today scraping wallpaper in the dining room. And on that note, I'd like to go ahead and make a little public service announcement: DO NOT PAINT OVER WALLPAPER. It will make it unbelievably difficult for someone to remove that wallpaper down the road when it starts to not look so hot. Thank you, that is all.

See. It's not coming off easy.

Now back to this Hot Wheels birthday cake. This was another cake that I did for Birthday Blessings KC, and this time I decided to try and go with a theme for one of the gifts that the birthday boy requested, which was Hot Wheels. On the cake requirements I received, it said that the birthday boy's favorite color was red, so that went along nicely with the Hot Wheels theme. I tried a new icing technique on the sides of the cake and it worked out pretty well. My friend Shayna and I tag teamed this cake while Joe and her husband, Greg, worked on our wood floors :) This cake came together really quick and personally I think it looked really cool! Here are a couple more pictures.


I found a new use for our aloe vera plant :) Drying icing bags!

Not much new is going on around here other than having two big snow storms in the last week. We had some friends over to watch the Oscars on Sunday night and had a really great time with them. Some of us may have had a little too much fun, ahem. We dressed up in our red carpet best (mine was my freshman year homecoming dress) and drank champagne.

We were the only 4 who dressed up.

Joe and I also bought a hot air popcorn popper that weekend so I could make a couple "fancy" popcorns for our party. Let me just say that this popcorn popper is possibly my new favorite kitchen appliance. It's just so fun and easy to use! I'll be posting a recipe for caramel corn sometime in the near future :) I guess that's it for tonight, have a great rest of the week!

Wednesday, February 20, 2013

Our New Wood Floors!

They're finally done! Last night, Joe and I nailed in the final boards for the new wood floor in the dining room. That completed the installation process for both front rooms of our house. We both love how they turned out and I have to say I'm quite proud of us for getting it all done. Before I go into our flooring process, you may have noticed that I've failed to post anything on here for the last couple weeks so I wanted to give you a quick recap on what we've been up to.

Just a quick "before" picture of the living room. 

Two weekends ago, Joe and I spent a while removing the carpet and preparing the sub floor in the dining room for the new wood floors. Then after a 7 mile(!) run on Saturday, my Uncle Dave and cousin Matt came in town and stayed with us for a night on their way to visit a school a little farther south in Missouri. It was good to see them and visit for a while. The next day I had to fly down to Houston for a pipeline conference and class that was from Monday thru Wednesday. The conference was fun (as fun as a pipeline conference can be) but the real highlight of the trip was getting to visit and have dinner with Mimi on Monday night. Mimi made a delicious shrimp casserole for me and my friend who was also at the conference. Thanks again, Mimi, it was good to see you! I got home on Wednesday afternoon and immediately started making two Valentine's desserts, one for Joe and I and one for me to bring to work. Then this past weekend was spent working on the dining room floor and making another Birthday Blessings cake (which I'll post about soon). Aaaaaaand I guess those are all the high points :)

The living room after tearing out the carpet.

Back to the floor. Joe and I had talked about installing floors in our living room and dining room for a while and after checking out the selection at Lumber Liquidators we found some flooring we liked but decided to wait for a really good sale. I signed up for email updates from them so when a good deal popped into my inbox we jumped on it and got our floors. A few weeks after that we finally borrowed the tools we needed from our friends (thanks Steve and Mandy & Paul!) and were able to get to work. Before getting started though, we watched a few helpful videos on YouTube about installing wood floors. It was slow going at the start when we were having to do all the nailing by hand, and the angled doorway in the living room didn't help matters either.

Joe nailing in the first row!

Evidence that I helped too. 

Once we were able to start using the nail gun though, we sailed along much quicker. The end was slow again when we didn't have room to use the nail gun and had to hand nail the boards.

Half way done!
But once it was complete and cleaned up, it was well worth the effort and the knee pain. I was the one who had to crawl around on the floor and place all the boards. Joe manned the nail gun. I only have finished pictures of the living room but you'll just have to take my word that the dining room is done too. There will be pictures of it eventually.

Done!


A slightly better picture with better lighting. Oh, and we plan to eventually refinish the lighter floors to match the new ones.
Thanks for sticking around through that lengthy post! I've got several other things to share with you on here so hopefully I'll be a little quicker between posts.

Tuesday, February 5, 2013

Birthday Blessings Cake

Before I tell you about another cake I made, I need to announce the winner for the Blog Birthday Giveaway. The winner is.....my Aunt Audrey! Congratulations! I hope you enjoy your new kitchen tools :) Thanks to everyone who commented to try and win. I wish I could send a prize to all of you!

Now back to the cake. I made this cake for a local organization called "Birthday Blessings KC". It is the second one I've made, but I forgot to take pictures of the first. Birthday Blessings KC is a group that provides a birthday cake, present and balloons to kids who may not have gotten much of a birthday celebration otherwise. Volunteers sign up to provide one of the three items and then they are all delivered together on the child's birthday.


I found out about this group from a flyer that I picked up at a local baking supply shop that I frequent. As soon as I saw it, I knew it was the perfect opportunity to give something back to the community while doing something I love. It doesn't hurt that I'm getting some good practice in with each cake I make too :) There are guidelines that Birthday Blessings sets for the cakes, like no fondant, or characters. The birthday children get to pick their favorite cake flavor and a couple of favorite colors for the cake, then the bakers get free reign from there. This cake was for a 1 year old little girl, and though I doubt she was able to pick her favorite flavor or colors, her parents requested a lemon cake and said the favorite colors were purple and green. I decided to try the ruffle icing technique that I've seen all of the internet lately. It was super easy and is now my second favorite way of icing a cake, along with the icing roses (like on the 4th of July Cake).

Close up of the ruffles.

On the first cake I made for Birthday Blessings, I used the icing rose technique. Although I didn't get a picture of it, you can catch a small glimpse of it on the Kansas City Star Newspaper website (it's the 3rd picture). It just so happened that on the day I had to deliver the cake to the organizers house, she was being interviewed by the newspaper about Birthday Blessings. The also interviewed me a little bit, but none of my interview made it into the newspaper :( At least they got a quick picture of my cake for the website since I didn't get any. I've signed up for another cake already, but it seems like the cake spots fill up quick. I hope to make many more though.


I guess that's it for tonight. I promise that in the next post, I'll show off those wood floors that we installed that I keep talking about! I hope you all have a great week and thanks again for all the nice comments on the blog birthday post!

Friday, February 1, 2013

One Year Blog Birthday!

It's finally the weekend! This has been a long week and as usual I'm afraid it's going to be a quick weekend. For today though, I'm going to celebrate the fact that I actually kept up with (and thoroughly enjoyed) writing this blog over the past year. When I sent out my first post a year ago today, I wasn't sure if people would read it, if I'd find enough to write about, or even if I'd be able to keep it up. Thanks to all of you who read this and give me positive feed back, I was encouraged to keep going. I really love when I hear that someone actually tried a recipe or project that I post on here and it has been so great to keep up with you all through this blog.

I try not to focus too much looking at my blog "stats", but it is fun to see how many people read the blog. Typically it's a pretty modest number, but last October that number really exploded when those Halloween wine bottles I made went crazy on Pinterest. Since then I've had many more views on the blog, but most of them are just for the wine bottles :)

You may have noticed that I post a lot of baked goods and sweets on here. That's because they're my favorite things to make AND eat! The problem is that I do eat them and I eat too much of them. I really wish I could share some of these things with you all, but logistically, it's kinda difficult. Instead I thought I would put a few of my favorite baking tools/utensils (new ones of course) together into a little prize for one of you. Consider it a birthday present from the blog :) Now I couldn't give you my absolute favorite kitchen tool which is my KitchenAid mixer, but maybe one day. The things that I do have to give away are:


- A Silpat baking mat - This will fit on a jellyroll size pan and is completely non-stick. It's great for cookies, breads and anything else you might bake, and it keeps you from having to waste parchment paper or grease the cookie sheet.
- A bench scraper - I use this to transfer chopped veggies from a cutting board to a pot, cut dough up into pieces, smooth the sides of cakes and who knows what else. It really is very useful.
- A pair of mini spatulas - I have a similar set to these and use them almost every day! They're great for scraping out small measuring cups that you can't fit a regular spatula in. They also scrape out jars and cans that aren't wide enough for other scrapers. And they're better than using spoons because they have nice flexible sides that make sure nothing is missed.
- Grease proof cupcake papers - These I really just wanted to throw in because they're fun. But the really great thing about them is that they are "grease proof" which means that they'll maintain their bright colors even after something is baked in them.


Well, that's all I have for you! haha. All you have to do is leave a comment below letting me know what you'd make first if you won this :) I'll leave this open for a few days so everyone who wants to has time to enter. The winner will be picked on Tuesday. This weekend before the Super Bowl I'm hoping to finally post about that special cake that I mentioned a couple posts back. I actually forgot to take pictures of it, but I'm making a similar cake for tomorrow, so I'll be sure to get pictures of that. Thank you again to every single one of you who actually reads this! You make it fun for me :) I hope you all have a great weekend, talk to you later!

Wednesday, January 23, 2013

Getting Organized: The Coat Closet

I'm maintaining two new year's goals right now; blogging twice a week and getting organized. Alright! :) And while I'm doing this, Joe is finishing prepping the living room floors for hard wood. Earlier we went running at the YMCA for our 1/2 marathon training and I finished a cake so I'd say it's been a very productive night so far! Too bad they aren't all like this. Oh well. This isn't really a long (or very interesting) post but I just wanted to share that I am in fact starting to organize small spaces around the house.

This weekend while Joe was on his way home from St. Louis, I went on a house cleaning spree. The kitchen needed the most work after finishing the puppy birthday cake, then making a huge mess on a failed hummus recipe. Then I did some laundry and actually PUT AWAY the folded clean clothes. When I went grocery shopping on Sunday morning I picked up a couple things I'd need for my two little organizing ideas that were floating around in my head. I started with the coat closet. Here is the before:


Not completely offensive, but also not super functional. The previous owners had 2 little hooks on the door that I had been hanging my scarves on. Then on the shelf above the coats we had been throwing all of our gloves, hats, more scarves, and who knows what else. The floor of the closet had gym bags, tennis balls, tennis rackets and a few other odds and ends.


The first order of business was to completely empty the closet and remove the 2 door hooks. Then I vacuumed the carpet and dusted the shelf. Next I unwrapped and hung up the first of my organizing purchases. A cheap, clear plastic shoe organizer. I actually got this idea from Mom and Dad since they also have a shoe rack hanging in their coat closet. It's just so good for taking advantage of unused space!


With the shoe rack in place it was time to start putting things back in. Pretty much everything that had been on the shelf went on the door organizer. The gym bags and tennis rackets went on the shelf and the only things left of the floor were the vacuum cleaner and Joe's work bag. There were a few items that didn't make it back into the closet at all, like the scarves. But I had a plan in mind for them anyway. Here's the finished coat closet!


The 2nd organizing tool I bought was this funky little coat hanger that is supposed to be used for ties or belts. My plan was to use it for all my scarves. And since it came as a 2 pack, I was actually able to use one for Joe's ties as well.


All I did was gather all my scarves (there were 15, yikes) and start putting them on the hanger.


Then it got placed in our closet  next to my purse holder and jewelry organizer.


Do you guys get excited about having things organized and neatly placed? I do! But I am easily amused. These projects made me feel like our house is a little less chaotic, and I'm happy to say that I have been using them everyday and putting things back in their place when I'm done with them. Funny story though, on Monday morning, I went to get my gloves out of the coat closet and although I KNEW that they were now on the back of the door in the shoe rack, I still got scared and jumped when I opened the door because when I first saw the shoe rack it looked like someone was in the closet! Needless to say I felt pretty stupid. Oh well. I guess that's it for tonight! Hope you all are having a great week and staying warm. It's been freezing here in KC! Talk to you later!

Sunday, January 20, 2013

Playful Puppy Birthday Cake

A few years of sending baked goods to work with Joe finally paid off! One of Joe's coworkers has twin baby girls who turned one yesterday, and he and his wife asked if I would make a cake for them. I said I'd love to, so they sent me a link to the party supplies they were ordering so we could figure out a cake design. The party theme was "Playful Puppy Party" and I thought it would be fun to recreate the little dog house with the puppy out front. They thought that sounded good too so it was time to get to work! I got to use my new square cake pans that I got for Christmas and they worked great. (Thanks Liz and Lance!) I baked three 8" square cakes and made fondant on Wednesday and Thursday nights then started assembling the cake on Friday.


I started the assembly by covering a cake board with green fondant for the "grass". Then I sliced each cake in half so there would be 6 layers and started stacking them with chocolate frosting in between. After they were stacked and refrigerated for a little bit, I carved it into a rough dog house shape. I had to use part that I cut off to add a peak to the roof.


After it was carved, I covered the whole cake in vanilla Swiss buttercream and tried to get it as smooth as possible. My last task for Friday night was making all the parts for the little puppy so they could firm up some overnight.


Saturday morning I did a little more work on smoothing out the buttercream before starting to try and cover the cake in fondant. I actually had to make a little more fondant on Saturday morning since there wasn't quite enough to cover the house. I also had to cover the cake in panels of fondant instead of how I usually do it which would be draping one large sheet of fondant over the cake. After the sides were covered, I cut a bunch of little shingles for the roof and put them in place. I thought that making shingles like that would hide imperfections better and allow me to cover the edges of the fondant panels on the sides. It also adds some nice texture to the cake.


After all the fondant was on, I decided to paint all of the fondant with thinned food coloring. I did this for 2 reasons. One is that it's a good way to get rid of all the cornstarch left on the fondant from rolling it out and two, it adds depth and dimension to the otherwise solid fondant colors. Here is how it looked after being painted.


Then it was just time to add all the finishing touches! I was very happy with how this cake turned out and for the first time ever, I was done well ahead of time. :) I delivered the cake and a couple cupcakes for the birthday girls. Everything made it there in one piece. Thanks to Tony and Robin for letting me make your girls' first birthday cake, it was a fun one!


I have another special cake to make this coming week that I'll share on here. It won't be a super fancy cake, but it will hopefully be the first of many special ones. I'll explain more when I post it on here :) Have a great week!

Thursday, January 17, 2013

Mean Green Soup

Training for a half marathon is hard, and we're not even done with week one. ugh. I'm regretting not running at all for the last 2 months or so. Oh well, no one to blame but myself. Though the running is hard and my legs are sore, I do have to say that overall I feel less tired and lethargic during the day so that's a nice change. However it has not made me want to get up and go to work in the morning any more than I used to. I guess it can't make everything better.

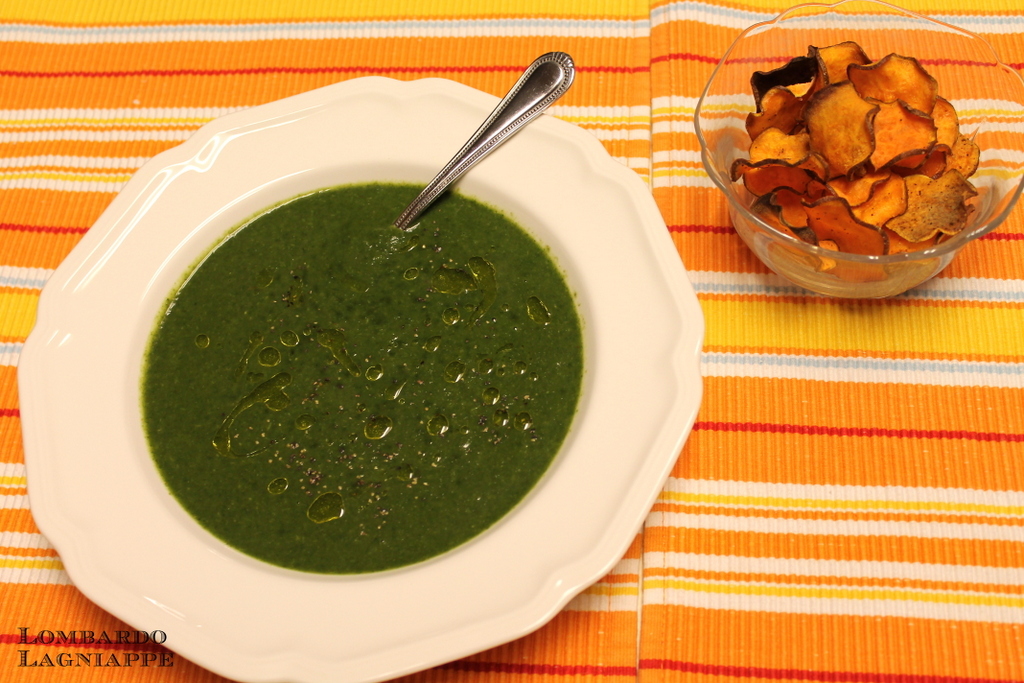
To go with this new training program, Joe and I have also started trying to eat a little healthier. I finally made some more of the energy bites that I wrote about in my 2nd blog post ever, and we've been stocking up on fruits and veggies. I saw this soup recipe in a Reader's Digest magazine at Mom and Dad's over Christmas and thought it would be a good way to incorporate lots of dark, leafy greens into our diet. I forgot to copy it down over Christmas, but Dad was nice enough to scan and email it to me. Thanks, Mom and Dad! Now I have to say, this is not the most appetizing looking soup. Maybe we can blame my not so great photography or the fact that I didn't have any natural lighting when I was taking pictures, but really I think it's just a bright green soup and it's not pretty. Despite it's appearance, it was delicious. Joe even really liked it and there was plenty of it leftover to take for a couple lunches this week. So if  you can get past it's looks, I highly recommend trying this, especially if you're like me and the thought of eating lots of soggy cooked kale or collard greens does not sound good to you. Here's the recipe!


Mean Green Soup (It's actually called Anna's Perfect Green Soup in Reader's Digest)
Serves 8

2 tablespoons extra virgin olive oil, plus more for garnish
2 yellow onions, chopped
1 teaspoon salt, divided
1/4 cup arborio rice
1 pound raw greens; kale, chard, mustard greens, collard greens)
14 cups gently packed raw spinach (about 12 oz.)
4 cups vegetable broth (I actually used chicken broth)
big pinch of cayenne pepper
1 tablespoon lemon juice


1. Heat oil in a large skillet over high heat. Add the onions and 1/4 teaspoon salt. Cook, stirring until onions begin to brown. Reduce heat to low, add 2 tablespoons of water and cover. Stirring frequently, cook onions until reduced and caramelized, about 25 minutes.

The onions cooked even more after this.

2. Meanwhile, combine 3 cups water, remaining 3/4 teaspoon salt and the arborio rice in a large soup pot. Bring to a boil. Then reduce heat to maintain a simmer, cover and cook for 15 minutes.

3. While the rice and onions are cooking, trim the tough stems or "ribs" from the greens. (I used kale and collard greens).Wash well and coarsely chop.

All these greens get hidden in the soup!

4. When the rice has cooked 15 minutes, add the 1 pound of greens, but not the spinach. Stir and return to a simmer. Cover and cook for 10 minutes. After 10 minutes, add the onions, spinach, broth and cayenne. Stir together and return to a simmer. Cook until the spinach is tender but still bright green, about 5 minutes.

A little blurry, but this is after adding the kale and collards. They reduce a lot as you'll see in the next pic.

This is after adding the onions and the spinach, and just before I blended it up.

5. Remove from the heat and use an immersion blender to puree the soup until smooth. You could also puree the soup in batches in a regular blender. Once smooth, stir in the lemon juice. When you serve the soup garnish each bowl with a little olive oil. We also needed to add some salt to ours since I didn't add enough in the first couple steps.


That's it! All of the caramelized onions really add flavor so it doesn't taste like your just eating cooked greens. I think next time I'll add some garlic too. There can never be too much garlic! I hope that you give this a try and that you enjoy it. Please let me know if you do or if you come up with any good variations! Now it's time for me to go work on a 1st birthday cake order for this Saturday. You know I'll share pictures when it's done :)