Monday, August 13, 2012

Sand Volleyball Cake

It's been another busy week/weekend at the Lombardo house.  We spent a good part of last week just trying to get back into our routine after being in Colorado.  Then on Thursday and Friday, Mom, Dad and Grace were in town on there way back to Ohio.  Joe got to go to a Kansas City Chiefs game on Friday night, then I spent most of Saturday working on this cake while Joe worked on the outside of our house.  I made this sand volleyball cake to celebrate my sand volleyball team's win of our most recent season.  We play multiple seasons throughout the summer and this Sunday was an off-week between seasons so we hosted a game night at our house to celebrate our recent championship.  I promised the team a volleyball cake so I had to deliver :)


Start to finish, this cake probably took 5 hours.  I had a little bit of a hard time covering the ball with fondant and making the volleyball pattern, but in the end I was happy with the result.  Of course, after the cake was complete I remembered that there was a volleyball template that came with my ball cake pan.  I was really kicking myself for that one.  When I cut out some of the white fondant to place the yellow panels on the ball, I was left with lots of cracks that were not so nice looking.  So I took a cue from what Joe was doing on the outside of our house and I "caulked" the fondant seams with icing then smoothed them out.  It made a huge difference and I was MUCH happier with the final look.  The "sand" was crushed cinnamon graham crackers and the cake was chocolate with vanilla icing, so I was hoping it would taste kind of like a s'more :)  I'm not sure it tasted like that in the end, but it was good.  I brought the leftovers to work and they were gone in no time.  Here are a couple more pictures of the finished product!

I drew a circle in the "sand" because we always draw one in the middle of the court when we're practicing.  You're not supposed to let the ball land in the circle.  Oops :) 


I have a few blog posts on backlog that I'm waiting to share with y'all, but I just need to sit down and write them!  Be on the lookout for some tasty braided pesto bread and to finally see that silly dresser that I've mentioned a few times.  For now Joe and I are trying to enjoy the awesome temperatures that we've finally gotten here.  We're not the only ones enjoying it though... We opened a few windows and we can here the neighborhood kids screaming, hitting things, blowing horns and just generally being obnoxious.  Oh well, it's just nice to not have 100+ degree weather.  I hope you all have a great week and enjoy the last bit of summer!

Monday, August 6, 2012

Trowbridge Family Reunion

Sorry for the radio silence over the last several days, but Joe and I have been on a whirlwind vacation to Montrose, Colorado for a family reunion with my Mom's side of the family.  For the last 20 years or so, the Trowbridge family has gotten together every other summer to visit, catch up and have fun with everyone since we always seem to be spread across the entire country.  Each reunion is planned by one of the 6 Trowbridge siblings, and the locations they pick are always beautiful and memorable.  Over the years our group grew to include Mimi and Papa, 12 aunts and uncles, and 20 grand kids (ranging in age from 28 to 5!)  Papa hasn't been with us since 2008, but his love of the mountains, nature and visiting new places that he instilled in his children has been passed down to all the grand kids and is still very evident every time we all get together.  We all miss Papa, and I know he'd be happy to see the tradition continue.

As I mentioned, this year's reunion was held in Montrose, Colorado which is west of Colorado Springs by about 4 hours.  Joe and I left home at 4:00 am last Wednesday morning and drove 13.5 hours to Montrose. We missed the first 2 days of the reunion, but still had a blast seeing everyone for the last couple days.  Each morning started off with a walk down to a little coffee shop for breakfast.  On Wednesday, a group of the guys went on a guided fly fishing trip, and from what I hear they were pretty successful!  But it was catch and release, so we didn't get to enjoy the fish they caught.  It was Joe's first time fly fishing and, he caught 7 that day.  While they were fishing, the rest of us explored downtown Montrose, then had lunch at the hotel before heading to a city park.  We played some frisbee and basketball, and Grace and I hiked to the top of the hill to get some great views of Montrose.  In the evenings we hung out by the hotel pool, played bocce ball, and ate some tasty food the parents prepared while letting us "kids" play.  Of course at those times, I am more than happy to still be considered part of the kids group :)

On Friday, several of the family members left for home and the group of us that remained made a trip to the Black Canyon of the Gunnison National Park.  It was a little bit of a scary drive to the bottom (16% grade!) but the canyon was absolutely beautiful!  We hiked around the river for a little bit, then drove back up to the canyon rim for some more scenic views.  Compared to the Grand Caynon, the Black Canyon is pretty small, but it was still stunning.  Friday night we went out to dinner in Montrose then played a couple board games before heading to bed.  Saturday morning we went to the coffee shop one more time before Joe and I hit the road for the long drive home.  We had such a great time seeing everyone and catching up on lost time.  We hadn't seen some our family since the last reunion in South Dakota two years ago!  We missed the aunts, uncles, and cousins who weren't able to make it this year, but look forward to seeing you sometime soon.

Now, I have to admit that I was TERRIBLE about taking pictures of the actual family at the family reunion.  I've got a few, but mostly there are pictures of the Black Canyon of the Gunnison.  I hope you enjoy the pictures I did get and I'll try and put a little caption about each one.

The littlest Trowbridge, Rebecca.  She was pretending to be a whale :)  

Adeline, Patrick, Joe and Grace playing bocce ball.

(Seated L-R) Patrick, Dad, Adeline, Kate, Lila, Grace, Thomas, Mimi, Charlie.  Good job to Mimi for being the only one smiling!

Grace at the top of the hill in the Montrose city park.  There was a frisbee golf course that went all the way too the top of the hill!

View from the top of the hill.
 
Can you find the prairie dog?  Grace spotted him on our hike down the hill.

The Gunnison River.  

Patrick.  Contemplating the great questions of life. :)

Mom.  Looking for some fish. :)

Hi, Gracie!  This makes up for the lack of pictures of you at the Robinson reunion.

The Black Canyon of the Gunnison, as seen from the bottom.  This was a relatively "shallow" portion of the canyon.

L-R: Andrew, Joe, Grace, Uncle Vaughn.

Can you spot Michael?  He was king of the rock.

View of the canyon from the top.

The river seen from the canyon rim.

I was a little nervous looking down into the canyon.
Joe and me, living on the edge.
 
Mary and Michael at the top.

This was a view from our car on the drive home.

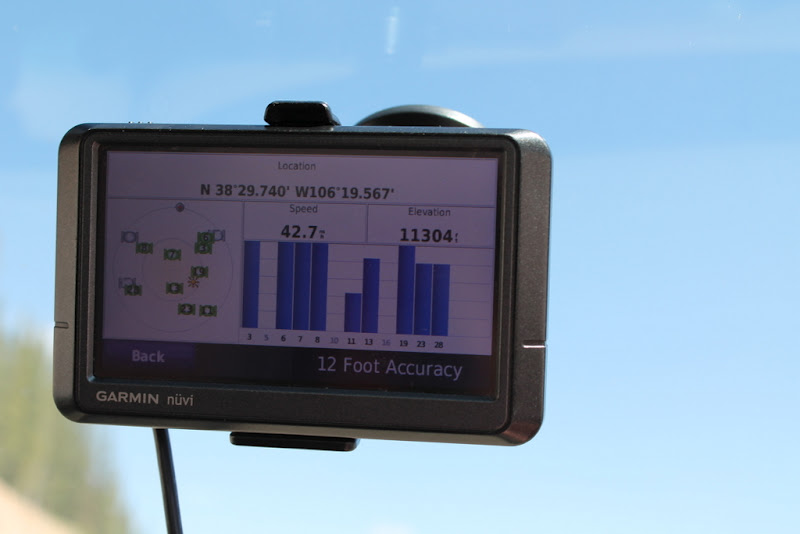
A screen shot of our Garmin at the top of Monarch Pass.  It was a long climb to the top which is along the Continental Divide.  

View from near the top of Monarch Pass.
I guess that's it for tonight!  Again, we loved seeing everyone who was there and missed those who weren't.  In other news, I've got a fun cake planned for this weekend.  I hope it turns out as cool as it looks in my head :)  Either way, it will make an appearance on the blog.  Have a great week!


Saturday, July 28, 2012

Simple Sprinkle Birthday Cake

Cake, icing, and cake filling are not safe in our house.  There is a 100% chance that if there is a tub of frosting in the fridge or a bag of cake scraps in the freezer, I will be eating it.  That being said, after I made the cupcakes for the wedding cake tasting, I was left with LOTS of delicious cake parts in our fridge.  Now, I did freeze a few types of filling so I have not been tempted to eat those, but there was a tub of buttercream frosting and peanut butter filling in the fridge that had to go.  Luckily, it was a coworkers birthday this past Thursday, and we were all planning on going out for drinks after work, so I decided to make a cake to bring along.  When I baked the wedding cupcakes I only made 12 of each kind so that I could also bake a 7" round layer of each flavor.  For this birthday cake, I used the vanilla and chocolate cakes, cut them each in half so there were four layers and spread a healthy (or unhealthy?) amount of peanut butter filling between each.


Then I frosted the cake with the leftover vanilla icing.  I wanted to add a little something extra to the cake though.  A little "lagniappe", if you will :)  So I made a quick chocolate ganache and poured it over the top, letting it drip down the sides.  Before the ganache cooled completely I shook on a few sprinkles and called it good.  


Unfortunately, the cake did not look this good by the time I brought it out for the birthday girl.  I had brought the cake to my desk during the day so it wouldn't have to sit in my car.  It looked fine when I left work to head to the restaurant, but after the very short ride in the car, every layer had shifted and slid to the side.  I blame it on the peanut butter filling since it gets VERY soft at room temperature and basically turned into a slippery slide for the cake.  We still ate the cake and it tasted good, but it was quite difficult to cut since the peanut butter filling made it kind of fall apart.  Oh well, now I've learned my lesson.  I still liked the look of the cake and will definitely make something like this again!


In these pictures you can see a little sneak peek of the dresser that we bought off Craigslist.  I've been working on a couple projects for decorating that dresser this weekend so hopefully I'll be able to post about it soon.


I hope you're all having a great weekend!  We'll see some of you next week :)

Tuesday, July 24, 2012

No-Knead Bread with Flavored Butters

When I last talked to y'all I was wishing a Happy Birthday to my sister Grace.  Today, before I tell you about this yummy bread, I'd like to wish a Happy 30th Anniversary to my parents.  Congrats on a long life of love together!


Dad is actually the one who told me about this no-knead bread after a coworker of his brought some in to work.  I finally got around to making it over a week ago but I haven't had a chance to write about it because we had such a busy weekend!  Friday night we drove to north Kansas City to buy a dresser that I found on Craigslist (it will be on the blog eventually), then we went to a friends house for game night.  On Saturday we worked on the outside of our house in the morning, then I worked on that dresser for the rest of the afternoon.  Then we ended up going to a different friend's house on Saturday night for more games!  On Sunday I spent almost my ENTIRE day making 5 kinds of cupcakes, 4 kinds of fillings and 2 kinds of icings.  A friend from Rolla has asked me if I'd like to make her wedding cake this October so I made all those cupcake combinations so she and her fiance could choose which flavor then want for their cake.  

Aaaaanyway, I just didn't have time to write a blog post, but now I do.  So back to the bread at hand.  This bread really was delicious and super easy to make!  It took a long time, but most of that was just waiting for the dough to rise.  I decided that if this bread turned out good, then it would need some tasty butter to go with it.  I used things we already had at the house to make 2 types of flavored butter, basil garlic butter and honey almond butter.  Both were amazing!  Joe really loved the basil garlic butter, but I liked the almond honey butter.  Even if you don't make this bread, you should definitely try whipping up some flavored butter for muffins, biscuits, pancakes, grilled cheese or anything else you could possibly want to spread butter on :)


Here is the recipe for the bread.  The only special equipment you need is a large, cast iron dutch oven with a lid.  

No-Knead Bread
6 cups bread flour (recommended) or all purpose flour
1/2 t. instant or active-dry yeast
2 1/2 t. salt
2 2/3 cups cool water


1. In a large bowl, combine the flour, yeast and salt.  Add the water and stir until all the ingredients are well incorporated; the dough should be wet and sticky.  Cover the bowl with plastic wrap and let the dough rest 12-18 hours on the counter at room temperature.  When the surface of the risen dough has darkened slightly, smells yeasty, and is dotted with bubbles, it is ready.

Wet and sticky dough.

How the dough looked after about 20 hours of rising.

2. Lightly flour your hands and a work surface.  Place the dough on the work surface and sprinkle with more flour.  Fold the dough over on itself once or twice and, using floured fingers, tuck the dough underneath to form a rough ball.


3.  GENEROUSLY dust a cotton towel (not terry cloth) with enough flour, cornmeal or wheat bran to prevent the dough from sticking to the towel as it rises.  Place the dough seam side down on the towel and dust with more flour.  Cover with the edges or with a second towel and let rise for 2 hours, until it has doubled in size.


Doubled in size.

4.  After about 1 1/2 hours, preheat the oven to 425 degrees.  Place a 6-8 quart dutch oven into the oven as it heats.  When the dough has risen fully, carefully remove the pot from the oven.  Remove the top towel from the dough and slide your hand under the bottom towel and flip the dough from the towel into the pot.


Trying to dump the dough into the pot.  But it was sticking...

Finally in the pot.

But this was left behind on the towel. :(  That's why I emphasized the GENEROUS in flouring the towel.

5.  Cover and bake for 40-50 minutes.  Uncover and continue baking for 5-10 minutes, until a deep chestnut brown.  The internal temp of the bread should be about 200 degrees.  You can check this with a meat thermometer if you want.

6.  Remove the bread from the pot and let it cool completely on a wire rack before slicing.

Mm mm mm

To make the butters you'll need a stick of butter for each flavor you want and whatever mix-ins you're planning on using.  I used the following things:

Garlic Basil Butter: 1 clove garlic (grated), 8 basil leaves (chopped), a pinch of salt
Honey Almond Butter:  Honey, slivered almonds (chopped), cinnamon, almond flavoring

I just threw in random amounts of ingredients for the honey butter, but it worked out ok :)


Once the bread is cool and butters are made, EAT, and reward yourself for waiting sooooo long for the dough to rise!  Another tasty way to eat this bread is to make a little plate of olive oil and spices to dip the bread in.


Well, this post ended up being longer than I intended, but thanks for sticking with it if you made it to the end, haha.  I hope you're all having a great week and let me know if you make this bread or any yummy butters :)